What if you were to sample everyday objects and make a drum kit out of it? Imagine the possibilities of recording a drinking glass as a cowbell, a laundry basket as a bass drum, an empty coffee can as a tom tom, and more. You can even sample your own voice and use those as sounds! Because GarageBand's AUSampler works like a regular sampler, the possibilities of what you can record are nearly endless. What you'll do is record your samples into Audacity, break them down and determine which samples you want to keep, then name each sample appropriately. From there you'll use GarageBand to import your favorite samples, map them across the keyboard, then record a track using those sounds in place of a drum kit. Sound easy? It is!
Microphone Basics
You can get by with using a simple, no-frills USB microphone; but you can go all the way to the high end and pay thousands of dollars for one. For sampling, you don't need a high-end microphone, but with microphones, you get what you pay for. Some manufacturer's such as Blue (www.bluemic.com) make professional-level USB microphones at consumer-level prices. The professional mics start with an XLR interface (three pics in a round jack), go down to the 1/4" cable (looks like a guitar cable), then you have 1/8" and USB interfaces at the low end. If your microphone can't plug into any of your Mac's input jacks, you'll need a USB or FireWire interface for it. Some microphones also require what's called a pre-amp in order to lift the input level to acceptable ranges.
If you plan on doing voice recording and the like, you may also want to make or purchase a pop filter. These are inexpensive metal or fabric filters that catch and eliminate the hard consonants like Ps, Ks, Bs, Ts, and the like. When pronounced, those consonants cause a force of air into the microphone which causes an audible pop. With the pop screen between you and the microphone, the microphone doesn't pick up those loud pops. Pop Screens can be had for under $20, but you can simply Google the words "make pop filter" for a list of links that show you how to make your own.
Using Audacity
Unfortunately, GarageBand's AUSampler doesn't let you directly record into the sampler. Sure, you can always record an audio track, but getting that track into the sampler takes too much effort and wastes time. It's better to use a recording program like Audacity. This method allows you to record into multiple files, edit the sound files before hand, and save them into a compatible format such as Apple's own .aiff format.
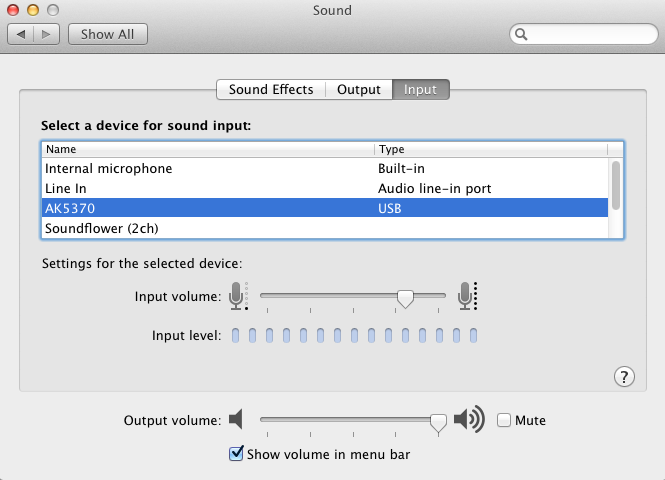
First, go ahead and connect your microphone. Once it's connected, it should be recognized in the Input tab of the Sound pane in System Preferences. Here you can select the microphone, then make a sound or snap your fingers near the microphone to test the input. The slider for the input volume lets you adjust the microphone's sensitivity:
Microphone Basics
You can get by with using a simple, no-frills USB microphone; but you can go all the way to the high end and pay thousands of dollars for one. For sampling, you don't need a high-end microphone, but with microphones, you get what you pay for. Some manufacturer's such as Blue (www.bluemic.com) make professional-level USB microphones at consumer-level prices. The professional mics start with an XLR interface (three pics in a round jack), go down to the 1/4" cable (looks like a guitar cable), then you have 1/8" and USB interfaces at the low end. If your microphone can't plug into any of your Mac's input jacks, you'll need a USB or FireWire interface for it. Some microphones also require what's called a pre-amp in order to lift the input level to acceptable ranges.
If you plan on doing voice recording and the like, you may also want to make or purchase a pop filter. These are inexpensive metal or fabric filters that catch and eliminate the hard consonants like Ps, Ks, Bs, Ts, and the like. When pronounced, those consonants cause a force of air into the microphone which causes an audible pop. With the pop screen between you and the microphone, the microphone doesn't pick up those loud pops. Pop Screens can be had for under $20, but you can simply Google the words "make pop filter" for a list of links that show you how to make your own.
Using Audacity
Unfortunately, GarageBand's AUSampler doesn't let you directly record into the sampler. Sure, you can always record an audio track, but getting that track into the sampler takes too much effort and wastes time. It's better to use a recording program like Audacity. This method allows you to record into multiple files, edit the sound files before hand, and save them into a compatible format such as Apple's own .aiff format.
First, go ahead and connect your microphone. Once it's connected, it should be recognized in the Input tab of the Sound pane in System Preferences. Here you can select the microphone, then make a sound or snap your fingers near the microphone to test the input. The slider for the input volume lets you adjust the microphone's sensitivity:
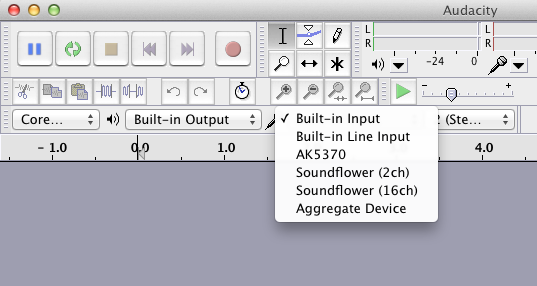
Open Audacity, and the input type above the sound wave window should list all of your input devices:
What things do you have lying around the house? Any empty coffee can? A drinking glass? A cardboard box? Let's try sampling a bass drum first. We will record all the sounds in Audacity first, then edit them little by little. The great thing is that you won't need to stop and start over if you make a mistake or don't like a sound. You can keep recording all the sounds you want to for a period, stop, then play them back. Then you can copy each sound file you want, paste it into a new file, and do all the editing for that particular file.
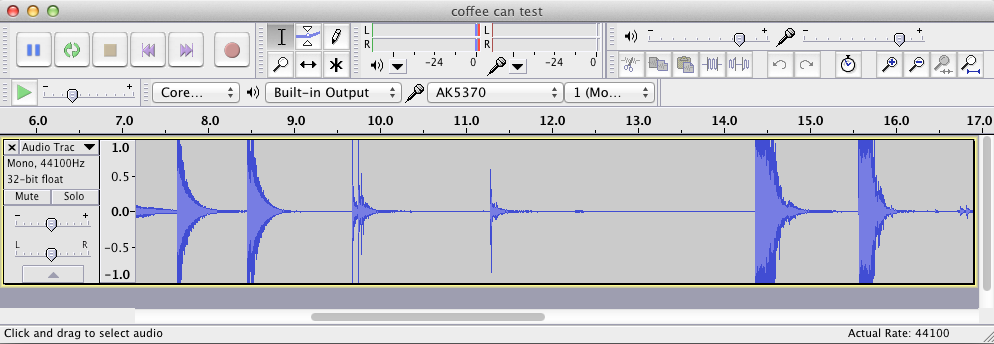
Here's the sound of me recording sounds emitted from striking an empty coffee can with a screwdriver. I aimed the microphone to a lower angle, and placed the open end of the can toward the microphone. There's no hard, fast rule that says it has to be struck on the top, so experiment as you please. I've created other sounds using the coffee can by striking it on it's side, on the top and bottom rim, with the plastid lid off and on, even striking the bottom and dragging the screwdriver to the edge:
Here's the sound of me recording sounds emitted from striking an empty coffee can with a screwdriver. I aimed the microphone to a lower angle, and placed the open end of the can toward the microphone. There's no hard, fast rule that says it has to be struck on the top, so experiment as you please. I've created other sounds using the coffee can by striking it on it's side, on the top and bottom rim, with the plastid lid off and on, even striking the bottom and dragging the screwdriver to the edge:
Because we will want to work with multiple files and save them, save this as an Audacity file. This way you can copy and paste bits of the sound file into multiple files, and save those as .aiff files. I saved the above file as "coffee can test". This identifies the sound of it coming from a coffee can. For the next test, I'll record the sound of my thumb thumping against my chest for a deep bass sound:
Although they sound okay when I do it, Audacity can't pick them all up the way they sound to me. However, there are a few good sounds in this one. Let's save this is "chest bass sounds". Now we can go ahead and record a few other pieces of things laying around the house. Save the last recording as "Various", then get to editing. First, let's load the coffee can file in Audacity. In my case, a lot of the recoded sounds clips as noted by the waveform reaching both the top and bottom parts of the window:
In order to get just the part you want, playback the entire recording. Highlight the desired part by clicking and dragging the part, copy this, create a new file, and paste the copied waveform in a new file. Now use the magnifying glass to go in closer to better eliminate the dead air and parts of the sample you don't want, then export (not save) it as an .aiff file. If your coffee can sample was too noisy also, go to the menu and select Effect → Normalize, set the field of "Normalize maximum amplitude to..", enter it as "-1.0" (db), and press enter. Now the clip should not reach the top and bottom of the waveform window. Now export it as "coffee_can1.aiff". Since my original coffee can recording had a weird sound when I hit and dragged the screwdriver over the back of the can, I repeated the process for that sound and named it "coffee_can2.aiff".
I didn't like the bass drums I recorded with my body, so instead I put a Christmas gift wrap tube over the mic and struck the tube. That was my bass sound. For the remaining samples I used a magnetic tray and empty drinking glass as bell sounds, and labeled them "bell_low" and "bell_high" respectively. I also recorded a cardboard insert over a hairbrush and the sound of my DeWalt drill. Whatever samples you have recorded, export them in the .aiff format with appropriate names. This will make it easier to distinguish the files and samples later on.
Now we're done with recording and can move on to exporting. The next video shows how to import each of the samples and map them to the keyboard:
When you do the same thing, you'll also notice that all the samples you imported also play at the same time. The solution to this is to map each sample to one key on the keyboard:
The next step is to modify the envelope so that when you release the key, the sound remains playing. With percussive instruments like a drum or piano, a part of the instrument is struck, and the sound continues playing. With wind instruments, the sound continues to play as long as the key is held down and the player is breathing into the mouthpiece. We want to set the envelope so that even whenever the key is held down or struck and quickly released; the sound will continue to play:
Now when you play the keys and release them quickly, the entire drum sound will play and take on a more percussive quality. Save the AUSampler set as a preset with the name of your choice. Now lets go make some beats.
Close the AUSampler window. At the bottom right of the track info window, click the button "Save Instrument" and give it a name like "My House Kit". With the track highlighted, go to the menu bar and select Track → Duplicate Track and repeat the process a third time. Now go ahead and hit record and start pounding out a beat using just the "bass" and "snare" drums. Stop at 8 bars, select the second track of "My House Kit", and start playing accompanying rhythm sounds using the samples you recorded. Lastly, do the same for the final track.
When you're finished recording, take the last track, hold the Command Key, and select the second track. Now go to the menu and select Edit → Join. This will combine the 2nd and 3rd tracks into one. Now repeat the process for the 2nd and 1st tracks and both of those will be combined. If you'd like to apply effects globally to the track, go to Track info, and select an effect. In the video below I combined all three of my tracks and applied the Phaser effect to the track:
Now move on to page 4.
