In terms of musical equipment, a Sampler is a device that allows you to record external audio, process it, and play it back from a keyboard or other instrument. Matthew Broderick uses an E-Mu Emulator II to play back various body sounds to fake his illness in Ferris Bueller's Day Off. Vanilla Ice sampled a riff from Queen's "Under Pressure" on his one hit wonder "Ice Ice Baby", and M.C. Hammer sampled Rick James' hit song "Superfreak" for the use in "Can't Touch This". DJs use samplers for their performances and to play back audio samples during broadcasts. Depeche Mode uses samplers for a lot of their past and present songs. Now with GarageBand, you can use the power of a sampler thanks to the hidden "AUSampler".
The Audio Units Sampler (AUSampler) isn't a full-fledged sampler such as the Kontakt sampler from Native Instruments, but you get some powerful features that you may not find on separate hardware units. You can import .wav, .aiff, or other audio sounds with a few tricks, even import your existing MP3 files and play them back. You can even record your own sounds using a microphone, map them across the keyboard, and play them back at varying speeds. You get the flexibility of GarageBand's built-in effects and presets, and you can use the samples in your own music compositions.
To access the sampler, add a new software track in Garageback by going to Track → New Track, then choose "Software Instrument Track". If it's not already visible, show the track information by going to Track → Show Track Info. From the Details section labeled "Instrument Generator", change it from "Piano" to "AUSampler":

To the right of the AUSampler, click the little pencil icon to edit it (GarageBand 5) or click the icon of the three horizontal sliders (GarageBand 6) and you'll be presented with the main screen. To show the editor, click on the lower left hand of the window on "Show Editor" and you'll see the following:
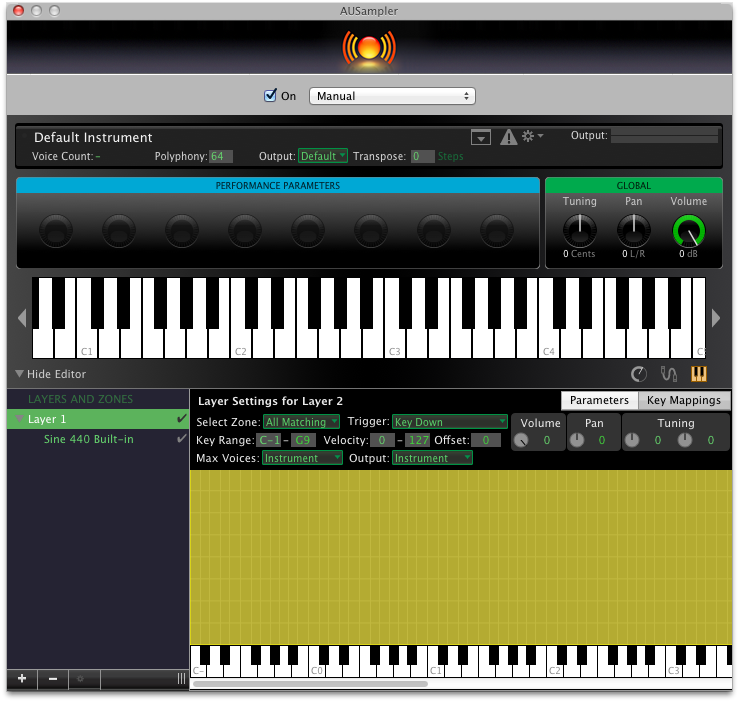
As you play the keys on your keyboard controller, the keys on the upper and lower parts of the AUSampler window will light up and the upper Output VU Meter will show the volume of the sample. You'll also see how many notes (voices) are being played at one time. The Polyphony counter shows how many sounds or samples are available to play at one time. The more sounds or samples you stack, the lower the polyphony count. Transpose indicates the number of steps, or notes, the pitch will be at. You can type in a number and press enter, and the notes will be transposed. To transpose lower, you'll have to add a minus sign before the number entered. In the top window above the keyboard is a section for Performance Parameters. These are user-defined attributes you can change on a sound by a controller knob or by clicking and dragging a mouse for the specific on-screen knob. This will be covered later. To the right are three more knobs: Tuning allows you to fine tune the sample being played, Pan lets you assign the sound to be left or right in the stereo field, and Volume allows you to change the volume of the overall sound. At the lower right of the top window are three icons:
These icons control the type of info displayed in the lower window of the AUSampler. The knob icon is to create and edit Performance Parameters, the cable-type icon is to control various characteristics of the sample, and the piano key icon (set by default) is used to add samples and control layers. Since it is loaded by default, let's take a closer look at the lower window:
Layers and Zones Grid Editor
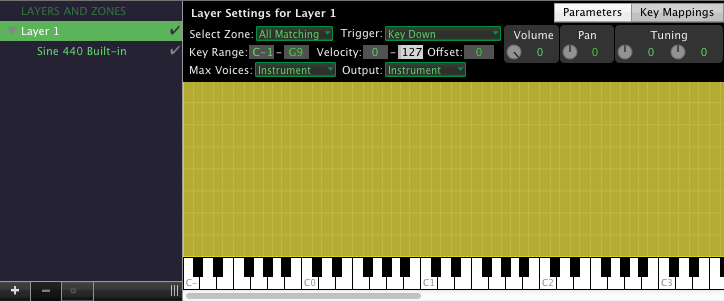
For the Layer: In the image above, the upper right part of the graphic shows Parameters and Key Mappings (currently selected). Under Key Mappings, the left hand pane shows layers and zones. Any layer can have one or more multiple zones contained in it. The Layers and Zones area is where you load various sounds in to be played. The checkmark to the right of each item indicates whether or not the layer or sample is activated. The lower plus sign lets you add a layer if an existing layer is already highlighted, or a sample if an existing sample is already highlighted, and the minus sign removes a layer or sample. The small gear icon also lets you create a new zone (sample), new layer, or lets you add a bunch of samples in bulk. Despite the icon being grayed-out, the box is accessible as is its contents.
The area for Select Zone can be left as-is, but once you add more samples and map them, you'll be able to experiment with the settings in the drop-down box. The Trigger default selection is key down, so that the sample plays when a key is held down. If this is changed to Key Up, the sample will only play after the key is depressed from being pressed.
How is this useful? The sound of a hi-hat being struck and then muted produces two different effects. You can have the initial hi-hat sound to play on the key down, and the hi-hat muting sound play on the key up. Using the Delay knob, you can have addition samples play seconds or milliseconds later. You can load the sample of a snare drum, but have copies of the same sample loaded and triggered (at lower volumes) on the key up trigger. This will produce an interesting delay effect.
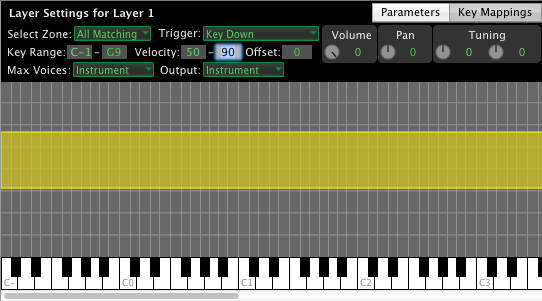
The Key Range will allow you to set the range for the layer of samples, not the sample itself (which is covered later). If you want to have a layer to begin or end on a black key, you would type the key (A B, C, D, E, F, G), the # sign, then the octave. So the next black key after C1 would be represented by "C#1". The entry is not case-sensitive, so you can lowercase letters in these fields. The fields for Velocity let you enter the velocity range for the layer to be heard. The range of MIDI has 128 numbers, so the field above shows zero through 127 (zero is a number in MIDI). If you limit the range, you'll see the yellow range produce a thinner horizontal bar because it doesn't take up the entire 0-127 range. For example, limiting the range from 50 to 90 results in this:
For the Layer: In the image above, the upper right part of the graphic shows Parameters and Key Mappings (currently selected). Under Key Mappings, the left hand pane shows layers and zones. Any layer can have one or more multiple zones contained in it. The Layers and Zones area is where you load various sounds in to be played. The checkmark to the right of each item indicates whether or not the layer or sample is activated. The lower plus sign lets you add a layer if an existing layer is already highlighted, or a sample if an existing sample is already highlighted, and the minus sign removes a layer or sample. The small gear icon also lets you create a new zone (sample), new layer, or lets you add a bunch of samples in bulk. Despite the icon being grayed-out, the box is accessible as is its contents.
The area for Select Zone can be left as-is, but once you add more samples and map them, you'll be able to experiment with the settings in the drop-down box. The Trigger default selection is key down, so that the sample plays when a key is held down. If this is changed to Key Up, the sample will only play after the key is depressed from being pressed.
How is this useful? The sound of a hi-hat being struck and then muted produces two different effects. You can have the initial hi-hat sound to play on the key down, and the hi-hat muting sound play on the key up. Using the Delay knob, you can have addition samples play seconds or milliseconds later. You can load the sample of a snare drum, but have copies of the same sample loaded and triggered (at lower volumes) on the key up trigger. This will produce an interesting delay effect.
The Key Range will allow you to set the range for the layer of samples, not the sample itself (which is covered later). If you want to have a layer to begin or end on a black key, you would type the key (A B, C, D, E, F, G), the # sign, then the octave. So the next black key after C1 would be represented by "C#1". The entry is not case-sensitive, so you can lowercase letters in these fields. The fields for Velocity let you enter the velocity range for the layer to be heard. The range of MIDI has 128 numbers, so the field above shows zero through 127 (zero is a number in MIDI). If you limit the range, you'll see the yellow range produce a thinner horizontal bar because it doesn't take up the entire 0-127 range. For example, limiting the range from 50 to 90 results in this:
Like the previous settings, you also get control over the layer's volume, panning, coarse- and fine-tuning. The settings for Max Voices are something you shouldn't worry about. Unless you're creating lush, complex compositions where 40 are more instruments are being played at one time, you need not worry about this. The setting for Output can be left alone as well.
At the upper right hand of the lower window, press the button next to Key Markings labeled Parameters, and you should see the following with three panels:
At the upper right hand of the lower window, press the button next to Key Markings labeled Parameters, and you should see the following with three panels:
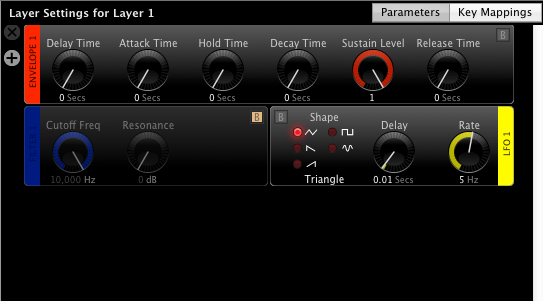
The panel with the red label reads "ENVELOPE 1" and gives you control over the sound volume and behavior. The knobs you see can be controlled by clicking the mouse over the knob, then dragging the mouse left and right. Note: Be aware that other knobs in different windows, both by third-party add-ons and Apple, can also be controlled by dragging the mouse up and down instead of left and right. If one method doesn't work, the other will. Below is a description of each knob and function.
An Envelope is a control parameter that shapes how the sound plays when a key is pressed.
Delay Time is the amount of wait time when you hold down a key. To see the delay in action, move delay to about 2 seconds (the value appears as you move your mouse to adjust the knob). Press a key down and keep it held down, and eventually you'll hear the sine wave sample.
Attack Time is the adjustment for how quick the sound volume is present before you hear it's initial volume. A snare drum is a sound that would have a sharp attack time since a sound is generated the moment that it hits a drum, but a flute would have a slower attack time since it's got a little breath to it before the sound plays. If you were to play the sample of an approaching police car with its sirens on, it would have an even slower attack time since you might hear silence, and eventually the sirens approaching for a far away distance.
Hold Time is the time a sound can be heard before it goes to the delay stage. To hear its effect; set the sustain time to 0, the adjust the hold time to about two seconds, then hold the piano key down. You'll hear that the note plays, and after around two seconds, the note shuts off. If you quickly press and depress a key, the note quickly plays and stops, so the hold amount has no effect when the key is being played that fast.
Decay Time is the amount that the sound starts to fade out. Using the above settings, set the hold time down to zero, then gradually increase the decay time while playing a key. The higher the number, the longer the delay. With a higher number, you will have to hold down a key longer to gradually hear the delay in the sound.
Sustain Level is the amount of sustain volume when a key is depressed. It can be considered an extra hold time. To hear this in action, set the decay time to around two seconds and the sustain level to about .75. Now play a key and hold it down. You'll hear the sine wave sound, then fade out, but instead of fading out to silence it's sustained.
Release Time is the parameter for controlling how fast or slow a sound can be heard after the key has been depressed. Lower numbers give a quick cutoff to the sound (such as a snare drum hit or water droplet), and higher numbers result in a sustaining sound (such as a crash cymbal or bell). To hear how this sounds; set delay, attack, and hold times to zero. Set decay time to 60 and the sustain level to zero. Now set the release time to around two seconds, then quickly press and depress a key. You can hear that the sine wave now has a bell-like quality to it as it's played then fades out.
The next panel down has a blue tag labeled "FILTER" and controls the timbre or brightness of a sound or sample. The default sine wave doesn't give you much possibility in showing what the filter can do, but once you load samples into the AUSampler, you'll have a better representation of it's capability. If you look closely, there's a vanilla-colored box with "B" in the upper right hand corner of the Filter panel. This is the button for BYPASS. The highlighted "B" means that the panel is bypassed and has no effect, but pressing the Bypass button again activates the panel. The Envelope and LFO panels also have a bypass button, but pressing the bypass on the envelope panel will stop any sounds from being adjusted in the active layer.
The last section is for LFO which stands for Low Frequency Oscillator. This is primarily used to add vibrato to sounds, similar to using and being controlled by the mod wheel on your keyboard. You can choose the waveform type, Delay before the LFO kicks in, and the frequency of the oscillator. Gradually increasing the mod wheel does not gradually increase the LFO frequency, similar to a Leslie effect on old organs.
For the Sample: Under Key Mappings, when you 're adjusting the zone and not the layer, you'll see a similar window like this:
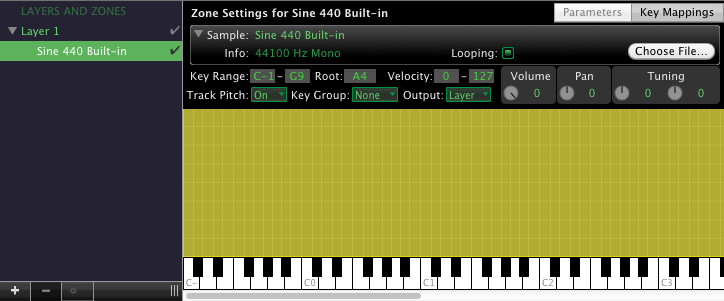
The Sine wave is there by default and is named "Sine 440 Built-In". To the right and at the top shows "Zone Settings for" followed by the name of the sample. Beneath that, the name of the sample is displayed along with the recording information (recorded at 44.1 khz sampling rate in Mono). The box for looping is checked (box filled in with a green square), which means that the sound loops for as long as the key is held down. With the box unchecked, the sound plays briefly. If you have a bell-like sample, drum sound, or a sound that decays naturally, checking the Looping box means that the sound will play repeatedly as long as the key is held down. Make sure this is unchecked for the appropriate sound you're using. If you're using a synth sound, string sound, or any sound that can play for a long period of time, it's best to keep the Looping box checked.
The Key Range here is similar to the key range for the layer, and the Root key is just as important. If I'm using a sample recorded in the key of C and I load it, I want to set the root at C followed by a number (the key that the sound was recorded), such as C1. The Key Range is best used when including the root key, and a range lower and higher. Therefore, if I have a string sound recorded at G2, I would set the Root key at G2, and the Key Range would be set from C2 to B2. If I have a string sample recoded at C1, the Root key would be C1, and the Key Range could cover C0 (all the keys in an octave below C1) and go to F#1, if I chose to set it there. The Velocity range here works exactly like the Velocity range for a layer.
Track Pitch for melodic sounds is best kept to "On". If this is set to "off", the sound will be at the same pitch no matter how high or low you play the keys, and the constant pitch is the value set by the box in Root Key. Key Group and Output parameters are best left as-is, for now. Like the parameters for the layer, samples also have knobs for volume pan, and fine- and coarse-tuning.
Now that you have some of the basics down, let's go and make some noise. On to Page 2.
