Save the Day With Dropbox
iCloud is a new program in OSX Lion 10.7.2 that will back up the data from your Apple desktop, laptop, or handheld device and allow that data to be restored later. It lets you back up entire contents of photos, contacts, calendars and more. Users of iPods, iPhones and iPads can use iTunes with iCloud and back up their data that way; both for Macintosh and Windows users. What if you're not sure that you want some of the data backed up? What if you wanted more control of what gets saved and what doesn't get saved? Even if you're not edging near iCloud's 5 GB limit, another program that gives you more control and flexibility is Dropbox.
Dropbox is a free program that allows you to save your data to the Internet using cloud computing, retrieve said data from the cloud to your computer or smartphone. It runs on multiple platforms which include Mac, PC, Linux, i-devices running iOS3 or later, Blackberry and Android. Like iCloud, Dropbox can be run not only using a web browser, but a separate application on the above platforms. When you install and use Dropbox, you get the flexibility of syncing specific files and folders between your Dropbox account and your computer and smartphone.
To install Dropbox, first go to their website at www.dropbox.com and download the file. The instructions here are for Macintosh but PC users will show similar screens. Once you go through the typical program installation steps, open the program, check the radio button for "I don't have a Dropbox account" and sign up for a free account. You'll be required to enter your first name, last name, email address, password, and computer name. The computer name is entered by default, but you can change this to your liking. Remember that if you want to install Dropbox on multiple desktops or laptops that you use, it's best to leave the default computer name as it is.
After that is complete, you'll see that the first window gives you options for immediate upgrade. For now, leave it at the default selection of 2 GB and press Continue:

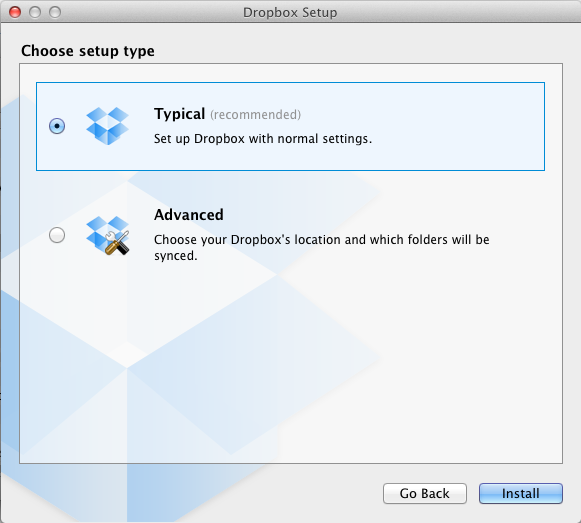
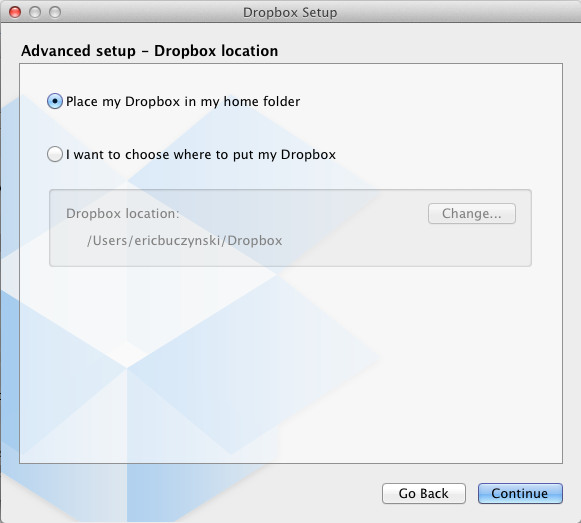
Next it prompts you for the type of setup; simple or advanced. The advance option only gives you the choice of installing the Dropbox folder somewhere else rather than the default location of your home folder:
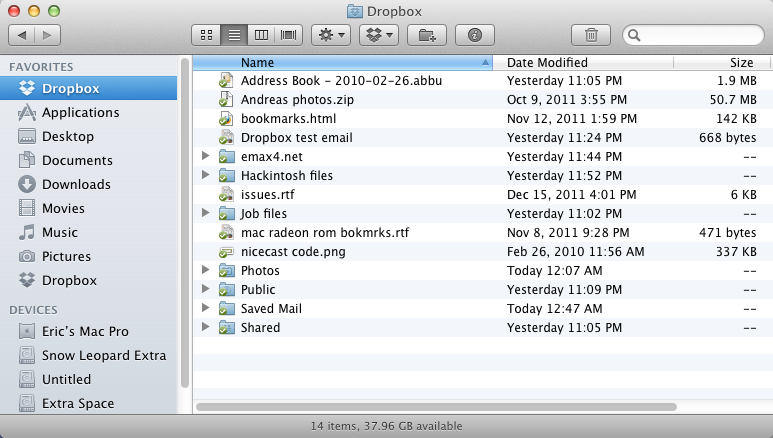
After that, you have the option of choosing which folders you would like to sync between Dropbox and your other devices with the Dropbox program installed. In the photo below, "Photos", "Public", and "Shared" were the default folders when the program was installed:

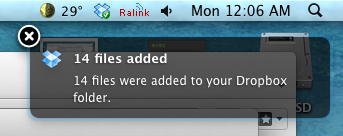
Once installed, you'll see a menulet at the upper right-hand corner for easy access (Mac version shown). In this screenshot, it is located to the right of the temperature and to the left of the RaLink wireless status:

A small check mark in a green box indicates that Dropbox is on standby mode, but the cursor in the blue box (as shown above) indicates that it is syncing files. To access the Dropbox window in the Finder, you can select the Dropbox icon from the sidebar (if you installed it at it's default location), or click the Dropbox menulet and select "Open Dropbox Folder":
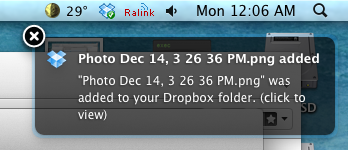
Whenever you add or delete files and folders from your Dropbox window in the finder, they get automatically updated to your Dropbox account in the cloud. When this occurs you'll see things such as the following below your menulet:
Look at the bottom half of the Dropbox window in the Finder and you'll see two folders; Public and Shared. The Public folder is for files that you can share publicly with non-Dropbox users, and the Shared folder is for files that you can share with other Dropbox users. There are some caveats that are important to know: If you open any Dropbox folder in the Finder, then right-click on an item, you'll only see the standard contextual menu of the Finder. If you're using the web browser version of Dropbox, then open the Public or Shared folder, you'll find an essential option there that's not in the Finder:
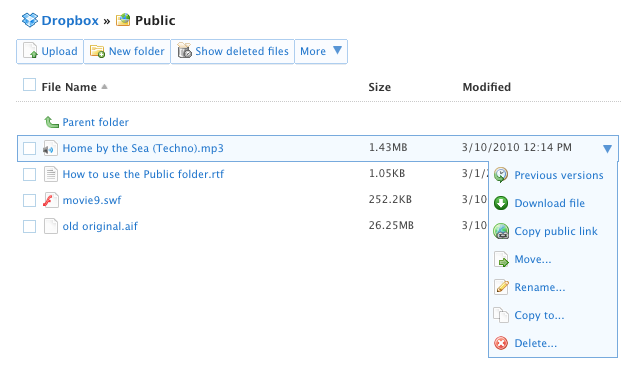
The above screenshot shows the contents of the Public folder. Clicking the arrow to the right of the item presents you with a drop-down list of functions. To share any item in the Public folder with non-Dropbox users, you would choose "Copy public link". Copying and then pasting this link into an email or document allows the recipient to click the link and access that file, but doing this doesn't grant the recipient access to any other files. The mobile versions of Dropbox give you the same option to copy the link to the file and paste it to an email, document or text message. What about the Shared folder? Opening up the Shared folder and clicking the rightmost arrow give you the same options above minus the "Copy public link" choice. Instead, you have to go back to the list of folders, then click the rightmost arrow on the Shared folder:
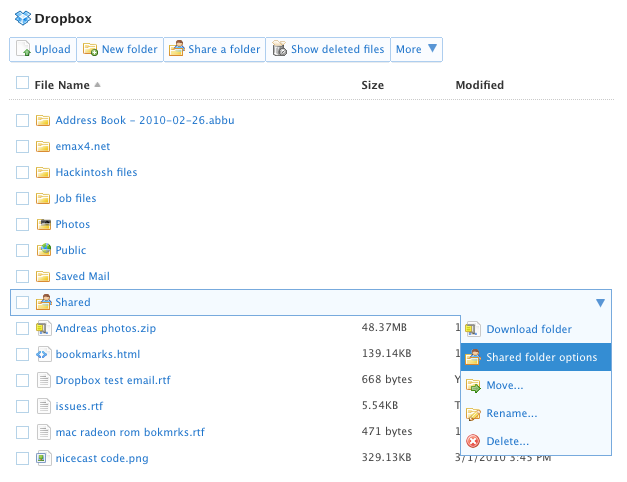
Here you can download the entire folder, move it, rename it, or delete it. This also gives you specific folder options:
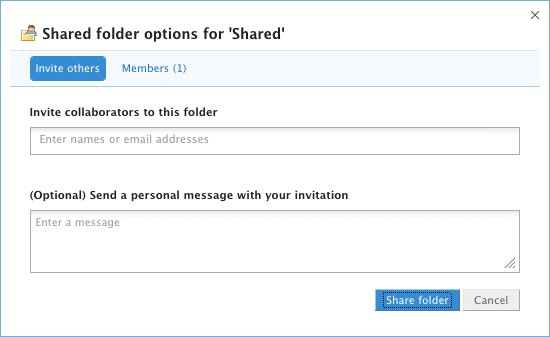
Under the tab of "Invite others", you can add people's Dropbox IDs or email addresses along with a short message with your invitation. The Members tab shows you people who you have entered before and have or have not responded.
If you have a file or files you want to share with Dropbox and non-Dropbox users, the best course of action is to copy or move the file(s) from Shared to Public, then copy the link and paste it in an email to one or more addresses, as opposed to sending out a notification from Dropbox to Dropbox users and a separate email with the copied link for non-Dropbox users. If you're using File Sharing, you can also go into System Preferences -> Sharing, activate File Sharing (If not already active), click the "+" button below the field of shared folders, then add your entire Dropbox folder or pick and choose which Dropbox folders you wish to share. This will make sharing Dropbox files and folders even more versatile.
Now let's move on to your Apple device. For the rest of this tutorial I'll just refer to it as your iPhone, but remember that the iPod Touch, iPads, computers, and some other smartphones will also work with Dropbox. Go to the App Store, then download the Dropbox app to your device. It will appear similar to this on your smartphone:

Once opened, you'll see the folders from the desktop Dropbox folder appear on your iPhone. The mobile version gives you four windows to choose from: The main Dropbox window, Favorites, Uploads, and Settings:
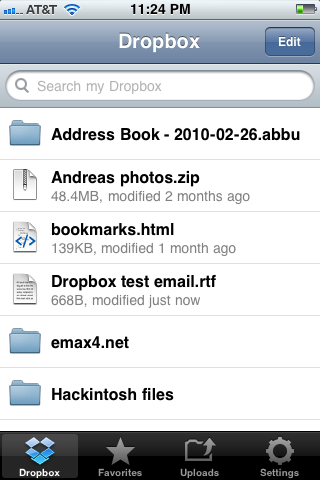
The main Dropbox window shows you the same information you would see by logging in to your Dropbox account from a web browser or the Dropbox application on your computer, but there are bottom icons to make navigating easier. The Favorites window shows you the Finder-type list of documents that you can mark as a favorite. When viewing a photo or text document from the mobile Dropbox app, you can click the center star icon at the bottom to mark that specific document as a Favorite. This feature is not present in the OSX version nor in the Finder submenu. The Uploads window presents you with a list of documents uploaded from your iPhone to your Dropbox account. This only shows items transferred from that specific mobile device and not your desktop or laptop computer. The Settings window gives you an overall status of your account along with buttons to view a Dropbox introduction slideshow, send feedback, send a pre-made email notification to others about Dropbox via email, and allows you to unlink your iPhone from Dropbox. Once you setup the Dropbox account on both your iPhone and your desktop or laptop, you'll be able to sync files and have more control over those files.
Dropbox also makes for a handy PDF viewer in a pinch. Let's say that I have an Asus P5B motherboard that I need to reference for some things. Maybe I'd like to work on the board, but I can't view a PDF if the only computer in the house is the P5B I'm working on. Here are the steps I take to view the PDF on my iPhone:
1. I'll Google the information. It looks like the very first search result is the one I want.

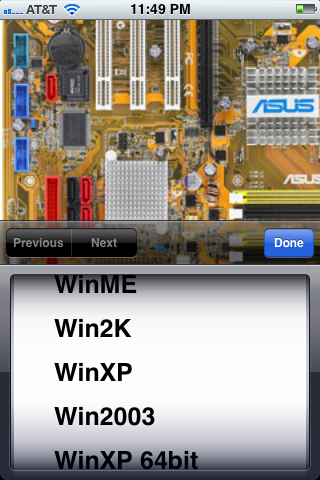
2. Because there are many files for different platforms on the Asus website, I have to select what operating system I'm using. Since PDFs are pretty much the same across the board I'll choose Windows XP:
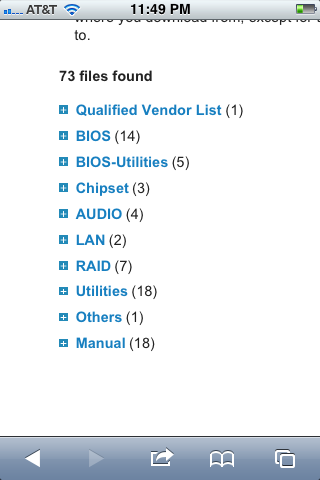
3. Once I go to the Asus website I search for the manual:
4. After selecting the file for download, a new Safari browser window opens with two options near the top; "Open in.." and "Open in iBooks". Doing nothing will cause the PDF file to load in the browser window, and the two options will disappear. To have these reappear, I simply touch the center of the screen. If I want to open in iBooks, the iBooks app will launch, and soon I'll see the manual appear in iBooks with the thumbnail previews of each page at the bottom and the viewing options at the top. However, if I choose "Open with..." I see the following:
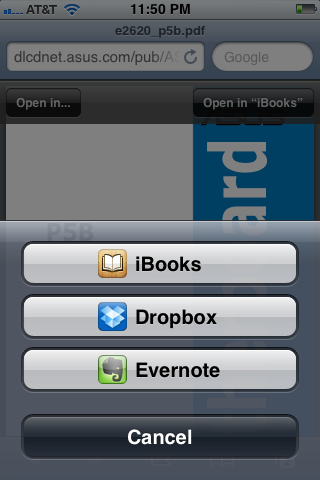
Again, I have the option for opening the file in iBooks, but I also have the option to have the manual opened in Dropbox (Evernote is another installed program that can open PDFs). By using iBooks to open it, the manual is saved on my iPhone in addition to Safari on the iPhone when I launch the Safari app. If I open it in Dropbox, I don't get all the viewing options I would get when using iBooks, but the manual is saved in the cloud. This way, if I were to forget my phone, I could still retrieve the pdf manual from any computer where I could access Dropbox. Since I'm using Dropbox to view it, let's take a look:
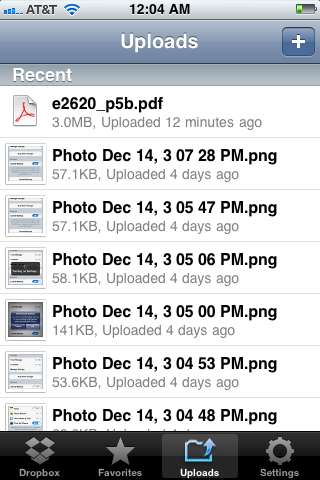
In the Uploads window, the Asus P5B manual is the latest download at the top of the list. Tapping it on the screen shows the PDF file opening:
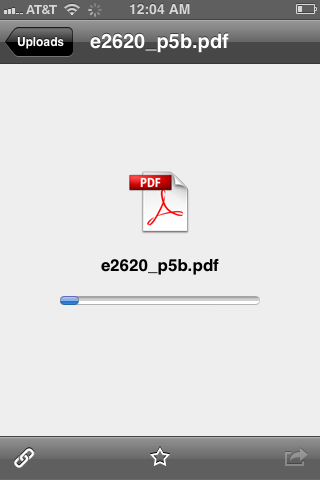
The status bar shows it loading, and when the load is complete it displays the following:
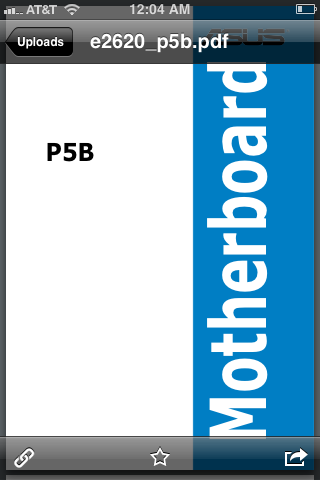
Now I have the Asus P5B manual in multiple locations on my iPhone and in the cloud! The same principle works in reverse as well. Let's assume you have a huge 50-page document in GoogleDocs, but the trouble is that in an hour after you plan to leave work and head home, the Internet servers will be down for maintenance. All you need to do is go into the GoogleDocs document, within the GoogleDocs window select File -> Download As.., and then choose PDF or Text. Once they're downloaded to your laptop or desktop, drag them to the Dropbox folder you want to, and that document is now saved and can be viewed on the iPhone while the Internet servers are offline. No time wasted!
I've tested the mobile version of Dropbox with an MP3 file and the program handled it well. It's not an iTunes alternative, but touching the item launched the built-in player. Here's how it looks:
I've tested the mobile version of Dropbox with an MP3 file and the program handled it well. It's not an iTunes alternative, but touching the item launched the built-in player. Here's how it looks:
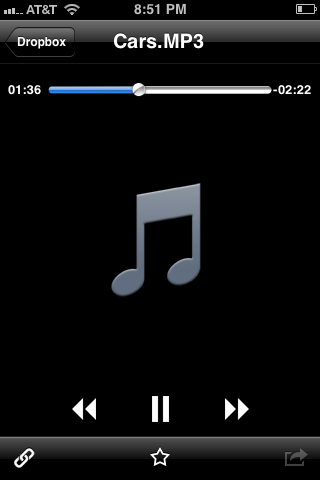
With an MP3 file, you'll notice that the bottom right hand icon is grayed out, so it won't let you send a link to the file or forward it on via email. Uploaded photos from Dropbox can be saved to the Photo library though, and text documents may be able to be opened with another app on your mobile device.
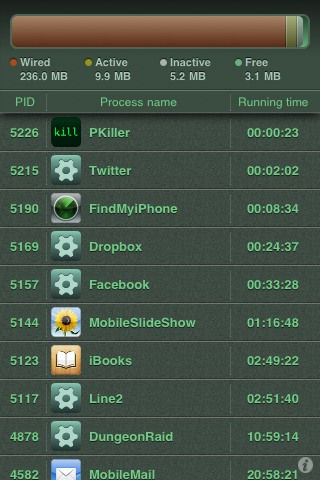
Having a similar look to the way iTunes looks on the iPhone, I had to check processes to be sure that Dropbox was playing the file instead of letting iTunes handle it. Opening up my Process Killer app, I saw that iTunes had not launched, so Dropbox was indeed playing the MP3 file:
Having a similar look to the way iTunes looks on the iPhone, I had to check processes to be sure that Dropbox was playing the file instead of letting iTunes handle it. Opening up my Process Killer app, I saw that iTunes had not launched, so Dropbox was indeed playing the MP3 file:
Uploading files from the mobile version is a snap. Simply choose the Uploads window from the choices at the bottom of the screen, press the "+" button in the upper right hand corner, and Dropbox will go to the Camera Roll:
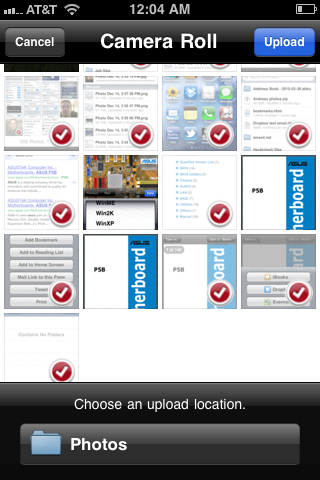
You simply tap on the photos you want to upload, choose the folder to where those photos will be uploaded to, then press "Upload" at the upper right hand corner. The photos will then be uploaded and saved to your account in the cloud. Right now, the mobile version for the iOS only allows for uploading of photos. For some worded documents you can create them in Mail and save them as a draft or email them to yourself, create them in Notes and email them to yourself, or even use the mobile version of GoogleDocs from Safari and create it there.
Let's say that you have photos taken with your iPod Touch of little Suzie's birthday party, but the first half of them show your thumb covering up the lens, and you want your non-Facebook-using relative at home to see the fun that you had. Using iCloud, you would end up backing up all of the photos, good and bad. Using Dropbox, you would be able to pick and choose only the ones you felt came out best. In addition, accessing them from iCloud requires the iCloud account holder to be in front of the computer to log in. Using Dropbox, you could simply store them in the Public folder and share the link to anyone with Internet access, even those who don't use Dropbox.
For Mac users, I would not recommend Dropbox as a do-all replacement for iCloud. iCloud has the all-too-important "Find My iPhone", which may not prove it's worthiness until it's truly needed. For pretty much everything else, Dropbox is the way to go. It gives the user more flexibility in what gets backed up and what you want to restore, it works on multiple platforms so you can have it set up on multiple devices, you can share your files with others using just one program, plays MP3 files and displays PDF files. For everything else, there's Dropbox!
